
This article explains the installation of Ajenti Control Panel on Rocky Linux 8 / CentOS 8. Ajenti Control panel is a free, open-source, lightweight, web-based Graphics User Interface control panel for Linux Servers.
1) Add EPEL Repository
First, before we install the Ajenti Control Panel, we need to add the EPEL repository required for the install of Ajenti dependencies.
sudo dnf -y install epel-release
Install Ajenti dependencies.
sudo dnf install -y gcc python3-devel python3-pip python3-pillow python3-augeas python3-dbus chrony openssl-devel redhat-lsb-core
2) Install Ajenti Control Panel
After adding the required repositories and downloading the dependencies, we are now set to install Ajenti Control Panel on CentOS 8|RHEL 8|Rocky Linux 8 using this command. This script downloads and automatically installs Ajenti
curl https://raw.githubusercontent.com/ajenti/ajenti/master/scripts/install.sh | sudo bash -s -
Sample Output:
.......
Collecting pip
  Downloading https://files.pythonhosted.org/packages/ca/31/b88ef447d595963c01060998cb329251648acf4a067721b0452c45527eb8/pip-21.2.4-py3-none-any.whl (1.6MB)
    100% |████████████████████████████████| 1.6MB 513kB/s
Collecting wheel
  Downloading https://files.pythonhosted.org/packages/04/80/cad93b40262f5d09f6de82adbee452fd43cdff60830b56a74c5930f7e277/wheel-0.37.0-py2.py3-none-any.whl
Collecting setuptools
  Downloading https://files.pythonhosted.org/packages/bd/25/5bdf7f1adeebd4e3fa76b2e2f045ae53ee208e40a4231ad0f0c3007e4353/setuptools-57.4.0-py3-none-any.whl (819kB)
    100% |████████████████████████████████| 819kB 949kB/s
...............
:: Installing Ajenti
Collecting ajenti-panel
  Downloading ajenti-panel-2.1.40.tar.gz (31 kB)
Collecting ajenti.plugin.core
  Downloading ajenti.plugin.core-0.98.tar.gz (15.1 MB)
     |████████████████████████████████| 15.1 MB 1.6 MB/s
Collecting ajenti.plugin.dashboard
  Downloading ajenti.plugin.dashboard-0.39.tar.gz (33 kB)
Collecting ajenti.plugin.settings
  Downloading ajenti.plugin.settings-0.30.tar.gz (46 kB)
................
:: Installing initscript
/bin/systemctl
Created symlink /etc/systemd/system/multi-user.target.wants/ajenti.service → /usr/lib/systemd/system/ajenti.service.
:: Complete

Ajenti will be listening at HTTP port 8000
Log in with your root password or another OS user
From the output above, Ajenti has been automatically started and enabled on your system. Check the status of the Ajenti service on CentOS 8|RHEL 8|Rocky Linux 8
Check the status of the service.
$ systemctl status ajenti
 ajenti.service - Ajenti panel
   Loaded: loaded (/usr/lib/systemd/system/ajenti.service; enabled; vendor preset: disabled)
   Active: active (running) since Thu 2021-08-19 07:46:27 EDT; 5min ago
  Process: 7554 ExecStartPost=/bin/sleep 5 (code=exited, status=0/SUCCESS)
  Process: 7552 ExecStart=/bin/python3 /usr/local/bin/ajenti-panel -d (code=exited, status=0/SUCCESS)
 Main PID: 7555 (python3)
    Tasks: 3 (limit: 6892)
   Memory: 44.7M
   CGroup: /system.slice/ajenti.service
           ├─7555 /bin/python3 /usr/local/bin/ajenti-panel -d
           └─7595 /usr/local/bin/ajenti-panel worker [restricted session]

Aug 19 07:46:21 rockylinux8.linuxvmimages.local systemd[1]: Starting Ajenti panel...
Aug 19 07:46:27 rockylinux8.linuxvmimages.local systemd[1]: Started Ajenti panel.
Configure Firewall
With the Ajenti service started, we need to open port 8000 on the firewall. With the port enabled through the firewall, we will be able to access and login into the Ajenti web interface. To allow the port through the firewall on CentOS 8|RHEL 8|Rocky Linux 8 use:
sudo firewall-cmd --permanent --zone=public --add-port=8000/tcp
sudo firewall-cmd --reload
3) Access and Use Ajenti Control Panel
Ajenti works on port 8000 with secure HTTP(HTTPS). Now we access the Web Interface using the server IP http://ip:8000 or domain-name http://domainname.com:8000.
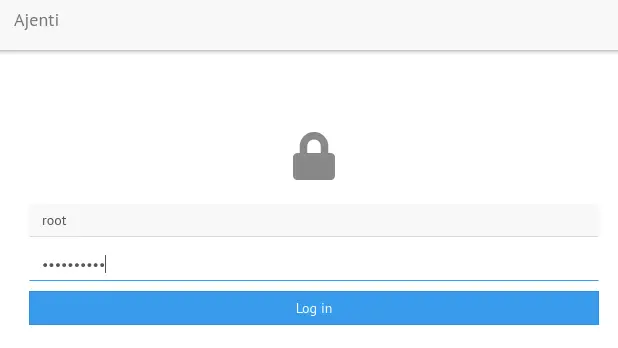
Log in with your system’s credentials i.e Username as the username on your system and password. On successful login, you will see the dashboard.